

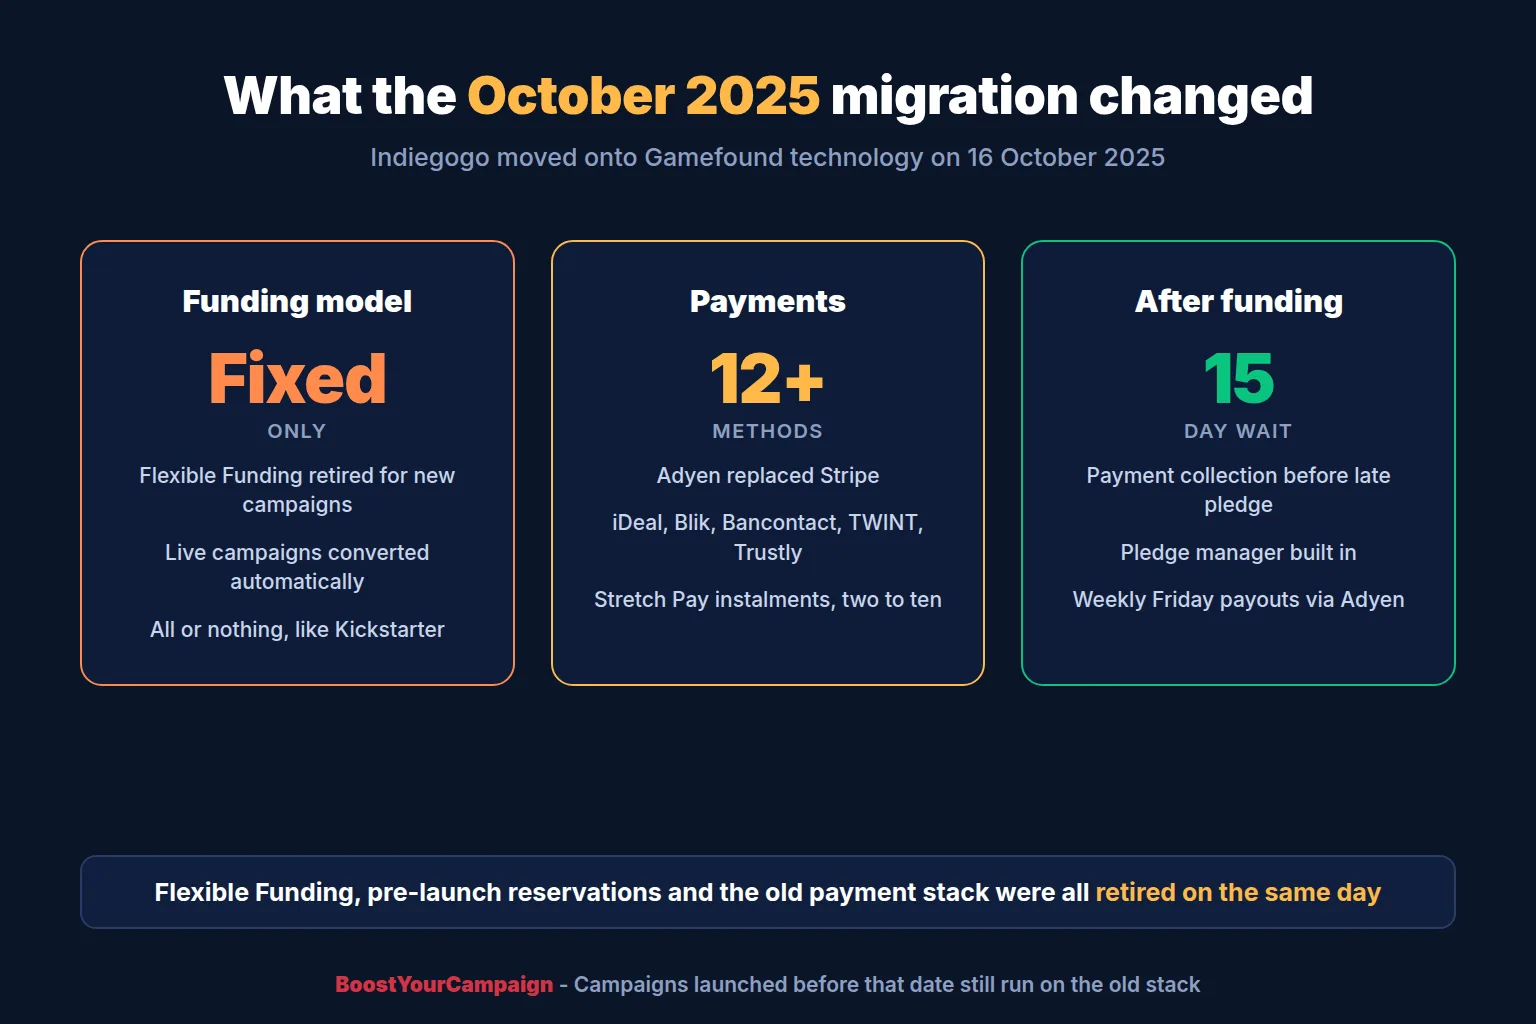
Indiegogo rebuilt itself on 16 October 2025. After being acquired by Gamefound in July that year, the entire platform moved onto Gamefound's technology, and a great deal of what creators knew about running an Indiegogo campaign stopped being true on that date. Flexible Funding was retired. Pre-launch reservations disappeared. The pledge manager, the payment stack, the onboarding process and the dashboard were all replaced. Most of the guidance published about Indiegogo online, including a good deal of what still ranks in Google, describes the platform as it was before that migration.
This page documents the platform as it works now. It covers the things creators actually get stuck on: what the onboarding review wants from you, how long a campaign review takes, what you can and cannot edit at each stage, how fees and payouts actually work, what happens in the fifteen days after your campaign ends, and how to set up the pledge manager without losing orders. Where a rule has a date attached, the date is given, because several of them changed again during 2026.
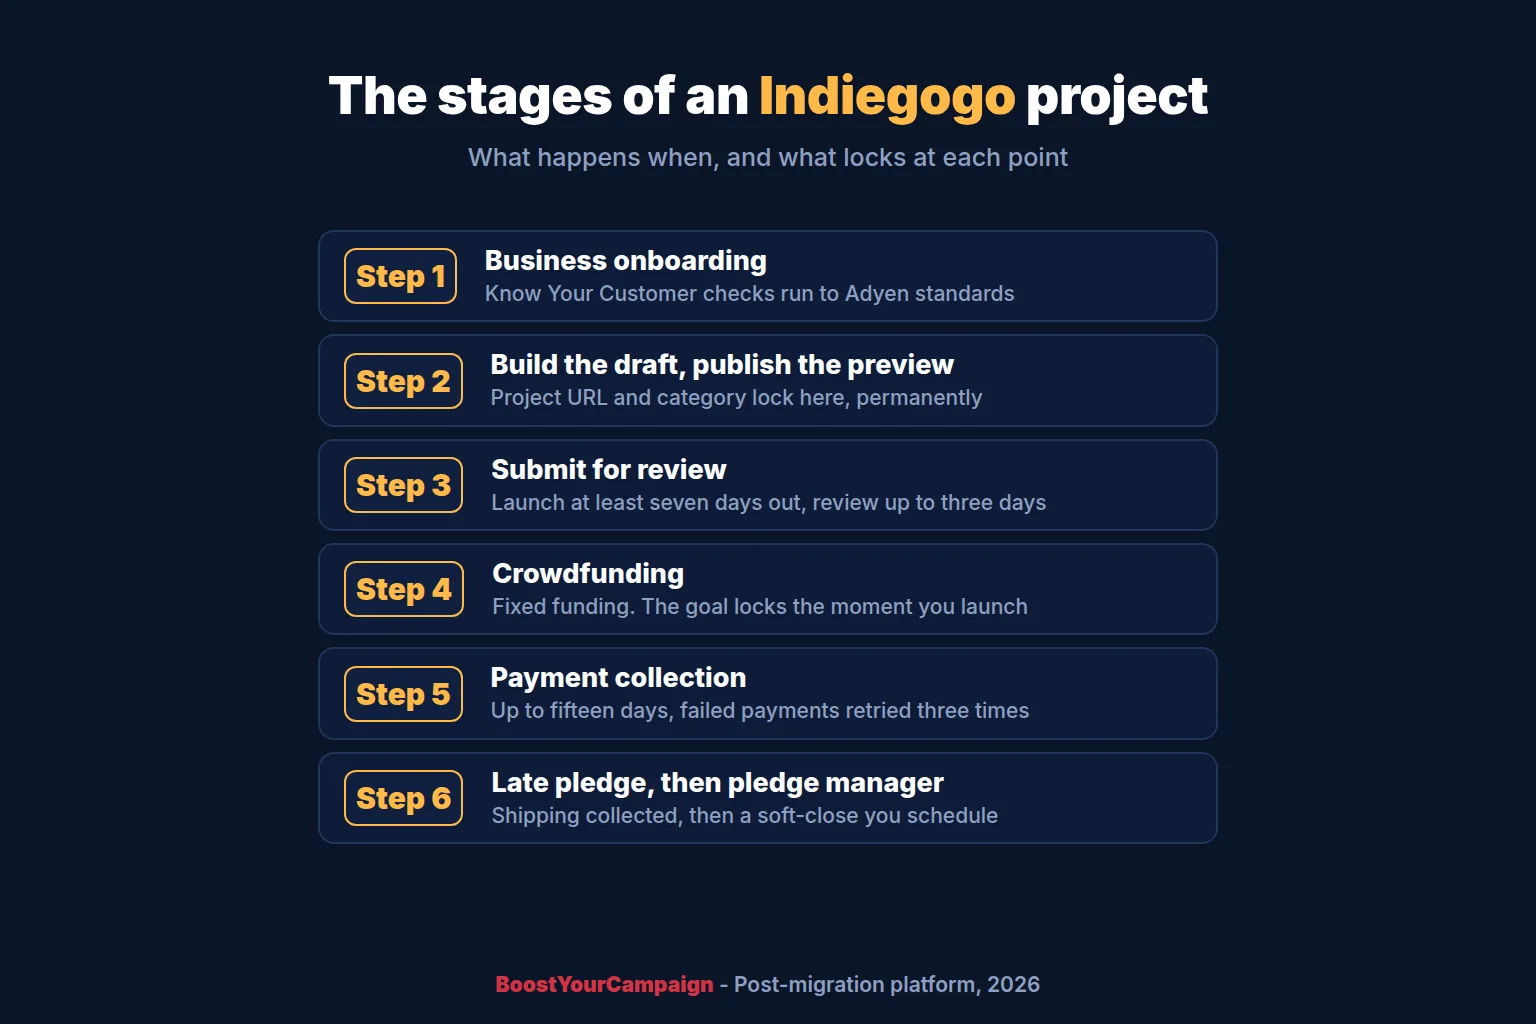
Indiegogo now runs on Gamefound technology following the October 2025 migration. Every new campaign is Fixed Funding, all-or-nothing. You publish a project preview yourself once business onboarding is complete, then submit for review, and the launch date must be at least seven days out. Review takes up to three business days. Fees are 5% of funds collected plus payment processing, charged only if you fund. Payouts run through Adyen, weekly on Fridays, starting three to five business days after the campaign ends. A fifteen-day payment collection period follows the campaign, then late pledge, then the pledge manager.
1) What changed in the October 2025 platform upgrade
If you ran a campaign on Indiegogo before October 2025, start here, because several things you relied on no longer exist.
Flexible Funding is gone
Flexible Funding, where a creator kept whatever was raised whether or not the goal was met, was discontinued for new campaigns on 16 October 2025. Every campaign now launches as Fixed Funding, the all-or-nothing model Kickstarter has always used. If your campaign does not reach its goal, backers are not charged and you receive nothing, including no fees. Campaigns that were live on Flexible Funding at the point of migration were converted automatically to Fixed Funding, with the goal adjusted to reflect funds already raised.
This matters more than it sounds. Flexible Funding was Indiegogo's main structural difference from Kickstarter and the reason a lot of creators chose it. That reason is gone, so the platform choice now turns on other things: payment method coverage, the built-in pledge manager, Stretch Pay, and which audience you are trying to reach. Our Kickstarter versus Indiegogo comparison covers how the two now differ.
Pre-launch pages became drafts and previews
What Indiegogo used to call a Pre-Launch page is now a Draft, which you publish as a project Preview. You can build the preview, publish updates on it, and talk to potential backers in the comments before launch. The Pre-launch Reservations feature was discontinued. If you collected reservations before the migration, they were carried across as payments tied to campaign orders, and any that went unclaimed appear as empty orders that can be applied toward rewards.
Drafts created during 2025 migrated automatically. Drafts from 2024 or earlier need a manual request to Indiegogo to be transferred.
New payment infrastructure
Campaigns launched after 16 October 2025 process payments through Adyen rather than Stripe, which is what unlocked the much wider payment method list covered below. Campaigns that launched before that date continue on Stripe with the older, narrower set of options. This is also why the onboarding process changed so much: Adyen's verification requirements are considerably stricter than what Indiegogo asked for previously.
New features that did not exist before
- Stretch Pay, letting backers split a pledge into between two and ten instalments
- Stable Pledge, a refund guarantee creators can opt into if their price estimates move
- A built-in pledge manager and late pledge system, replacing the need for a third-party tool in many cases
- Endgame, which extends the final countdown while pledges are still arriving
- Tester mode, letting you place test orders at any campaign stage without touching a payment provider
- Automatic and manual stretch goals built into the project settings
2) Getting an account and passing business onboarding
Business onboarding is where most first-time creators lose days, and it is worth understanding before you start rather than after a rejection.
Creating the account
Accounts are created by email link only, which surprises people expecting a password form. Enter your email, click Continue, and Indiegogo sends an activation link. Check spam if it does not arrive within a few minutes, because if you never receive it the only remedy is to repeat the whole process.
The registration form then asks for your full name, which is how Indiegogo addresses you in email, a nickname, which is how you appear publicly in comments, your email as the login, and a password. Choose the nickname deliberately. It is the name backers see on every reply you post for the next year.
Finding the admin area
Everything in this guide happens in the admin area, which is not obvious from the public site. Click your avatar in the top right and choose Go to admin area. It opens in a new window. To go back to the backer-facing view, use the same menu and choose Go to Indiegogo. The admin area lists all your projects, with navigation down the left.
Creating the project
From the creator dashboard, click Creator, then My Projects, then Add a project in the top right, then choose Indiegogo campaign. The General setup page then asks for everything in one go:
- Project name and URL. The URL is generated from the name but can still be changed at this point, and only up until the preview goes live
- Project categories and a short description
- Thumbnail and cover image
- Contact email, legal entity type and location
- Currency, which is offered based on your country
- Campaign goal, the minimum you want to collect
Accept the creator Terms of Service and click Create project, and you land on the project dashboard. Note that your legal entity type and location drive what onboarding will ask you for, so answer them as the entity that will actually receive the money, not as yourself if the campaign is run by a company.
Payout currency
Your project currency should normally match the standard currency for your country of residence: USD in the United States, CAD or USD in Canada, GBP or EUR in the United Kingdom, EUR across most of Europe, CHF or EUR in Switzerland, EUR or PLN in Poland, AUD in Australia, SGD in Singapore, HKD in Hong Kong, NZD in New Zealand. Indiegogo will sometimes agree to a different currency, but those setups can carry restrictions on payout frequency and minimum payout amount, so raise it before you build rather than after.
What onboarding actually is
Before you can publish even a project preview, you have to complete business onboarding. This is a Know Your Customer process run to Adyen's standards, not Indiegogo's, which is why it is stricter than creators expect and why the failure messages can feel pedantic. Adyen is verifying that the bank account you nominate genuinely belongs to the legal entity running the campaign.
The bank document, and why it gets rejected
The single most common onboarding failure is the bank document. It can be a bank statement, a deposit ticket or form, a screenshot of your online banking, an official letter from the bank, or a cheque. Whichever you choose, it must meet all of the following:
- It shows the full account number. Not a masked format like XXXXX0134
- The account number matches exactly what you typed into the Account number field
- It shows the account owner's name, and for a company that must be the legal entity name, not a trading name or "doing business as" name
- It is not a personal account belonging to a shareholder or a different company
- It was issued within the last 12 months and carries a visible date of issuance
- It clearly came from the bank: a logo, letterhead, signature or stamp
- It shows the country of the account. An IBAN covers this in the EU; US, Canadian and Australian documents almost always carry a bank address
File requirements: JPEG, JPG, PNG or PDF, one file only. PDFs between 1 KB and 15 MB, other formats between 100 KB and 15 MB.
Direct deposit tickets and official letters have an extra requirement: they must carry a bank logo or letterhead and be signed or stamped by the bank.
The practical advice
Pull a full PDF bank statement from your business banking, dated within the last month, before you start. It satisfies every criterion above in one document and skips the back-and-forth entirely. If you are launching through a company, make sure the company name on the statement matches the registered name on your incorporation documents character for character.
Business account details, and submitting them
Under Project settings, then Business account details, you supply personal data, bank account information and, for a company, the company details and shareholder data. What is asked for depends on whether you registered as an individual, a business or a sole proprietorship. Everything is verified by Indiegogo and passed to Adyen.
The step people miss: after uploading everything you have to click Submit for review in the main Business account details view. Uploading is not submitting, and a set of documents sitting unsubmitted looks identical to one under review.
Campaigns that launched before 16 October 2025 do not repeat any of this. They transferred automatically, stay on Stripe, and keep running as before.
The backup refund method
One required setup step is easy to skim past and expensive later. Under Project, then Settings, then Backup payment method, you add a payment method used to cover refunds when your balance is too low to fund them.
Without it, you cannot process a refund at all until a new pledge arrives large enough to cover it. That means a backer waiting on a refund, in public, while you wait for someone else to pledge. Every transaction through it carries a 3% processing fee. Add it during setup, not during a dispute.
3) Building the project before you launch
Indiegogo does not enforce a fixed order for setup, and different creators build in different sequences depending on project type and phase. Treat the list below as a map rather than a checklist.
Choosing a project type
The platform supports several ways to collect funds and manage orders. Crowdfunding is the standard all-or-nothing campaign. Express Crowdfunding is a lighter-weight version. External Campaign is for projects crowdfunded somewhere else, typically Kickstarter, that want to use Indiegogo only for the pledge manager and late pledge stages. Choose this first, because several later settings depend on it.
General project settings, and the fields that never unlock
Project settings hold the fields that define the project itself. Three of them cannot be changed once you publish, so get them right the first time.
- Project URL. The public web address. It cannot be changed after publication, at all, by anyone. Decide it deliberately rather than letting it be generated from a working title.
- Project category. A single category that best describes the project. It also cannot be changed after publishing.
- Project name. Changeable after launch, but only by contacting your account manager, so it is not something you do casually mid-campaign.
The rest of the general settings are more forgiving. Project tags help people find the project and you can hold several. Item weight unit sets the default weight unit across every admin view, so pick kilograms or pounds once and stay with it, because mixing units inside shipping rules is a reliable way to mis-price a zone. Publication date records when the project went live.
About, gallery and the project timeline
Three more parts of the page live under Project settings, then Project details, and none of them is in the Detailed description editor.
About holds the short description shown directly under the project title. Gallery holds the images and video shown as the main graphics at the top of the page, and each project stage can carry a different gallery, so the pledge manager page does not have to reuse your campaign hero.
Project timeline is a section that shows backers what happens when: Upcoming, Crowdfunding, Funded, Late Pledge, Pledge Manager. You set all the dates yourself, add notes against them, and choose where the timeline sits on the page from the Detailed description settings. It is optional and most creators skip it. Fill it in. Half the questions a campaign receives in its final week are some version of "when do I get charged and when does this ship", and a timeline answers them without you writing a single reply.
The custom thank you message
Under Project settings, then Communication, you can write the message a backer sees immediately after pledging. Leave it empty and they get "Special thanks from Creator" with nothing after it. That moment is the single highest-attention point in the whole backer relationship, and the default wastes it. Use it to tell them what happens next and where updates will appear.
The same Communication screen holds your contact address, the launch image, and the pledge manager reminder button covered in section 11.
The project page builder
The page itself is built under Project settings, then Project details, then Detailed description. The editor is organised by project stage, because a project on this platform passes through draft (preview), crowdfunding, and late pledge or pledge manager, and each stage can carry a different page.
Some sections are created for you. The crowdfunding draft gets a project story and a rewards section, the latter unpublished by default. The live crowdfunding page gets a project story, a rewards section, risks and challenges, and refunds and cancellation. The pledge manager page gets a project story, a rewards section, and refunds and cancellation. You can add as many further sections as you want, and every section title appears in the navigation menu down the left of the project page, so section names double as your page contents.
Two behaviours confuse people. First, every new section is unpublished by default, shown with a yellow frame in the editor, turning grey once published. Second, publishing a section inside a given stage does not make it visible before that stage starts. If you publish your crowdfunding sections while the project is still a draft, they appear only when crowdfunding launches. That is the intended behaviour, not a bug, and it is what lets you prepare the live page in full before launch day.
Required sections cannot be deleted, but they can be moved and unpublished.
Media inside the page, and the sizes that matter
The editor takes your own MP4 or WebM animations up to 20MB, and embedded videos by URL, though not playlists. Uploaded images are converted to webp automatically. The recommended image width is 840px or more, up to a maximum of 1200px, with a maximum height of 12000px and a maximum file size of 20MB before conversion.
For video embedded inside the description, aim for a width of at least 840px and keep the aspect ratio sensible. Anything taller than roughly 1:3 renders badly on mobile browsers, which is where most of your traffic will read the page.
Separately from the page content, the project itself needs a set of images, and the platform will let you download templates for them.
| Image | Size | Notes |
|---|---|---|
| Project thumbnail | 700 x 700 (1:1) | Used in listings such as the explore page. Follower and backer counts overlay the bottom of it, so keep that strip clear |
| Cover image | Minimum 1743 x 498 (21:6) | Background at the top of the project page. Optional, but without it you get a plain dark background. No text, because a darkening filter is applied automatically |
| Social media image | 1200 x 630 | Used when the project is shared. Falls back to the thumbnail if you do not set one |
| Gallery | Standard formats | Images and video, shown at the top of the project page |
The thumbnail earns its keep. It is what people see in listings and in every share, and it is usually the difference between a click and a scroll past. Treat it as a piece of design work rather than a crop of the hero shot. Our campaign design guide covers what a page needs visually.
Rewards, step by step, including the part that catches everyone
Rewards live under Products, then Rewards. The mental model matters here and trips people up: on this platform a reward is a set. It contains at least one set item, and you cannot put a set inside another set. That single rule is what makes the publishing process longer than creators expect.
Step 1: create the reward
Choose Rewards from the dropdown, click Add reward, and you land in the reward settings. Under General info you fill in:
- Reward name, as backers will see it
- Is published, the visibility toggle. More on this below, because it is not the only gate
- Regular price, treated as a net price excluding tax and VAT
- Discount price. Set it and it becomes the actual price, with the regular price still shown struck through. Leave it empty to use the regular price
- Estimated delivery date. Only the starting month and year are shown to backers
- Delivery date remarks, which appear as a tooltip beside the date
- Product groups, if you want to restrict who can see this reward
The other tabs down the left are Description, which is the text and media shown when a backer clicks into the product, Gallery, where the first image you add becomes the main product image on the campaign page, Shipping, which carries SKU, weight and the shipping calculation mode, Availability, and Stock.
Step 2: add the set items
Choose Reward items from the menu on the left, then add a product to this reward. For each item you give a name and the number of pieces included.
You have two choices here and they behave differently. You can pull in an existing product, typically an add-on you already built, by typing to search. If that add-on is buyable, it then sells both separately and as part of this reward. Or you can create a new item from the suggestion list, which makes an item that exists only inside this reward. Sets cannot be added as items.
Once added, click an item to open its settings or the three-dot icon to change its name and quantity, jump to its full product settings, or delete it. Items that are not sets carry two extra fields: Is featured, which puts a featured tag on it at the top of the product section, and Type and Category, which is how you move a product between rewards and add-ons. Items sitting in the Rewards category cannot be sold as standalone products.
Step 3: publish every set item first
This is the step nobody expects. You cannot publish a reward set until all of its set items are published. Work through each item and publish it. If you skip one, the publish action on the reward simply is not available, and there is no message telling you which item is holding it up.
Step 4: publish the reward itself
Back in the Rewards list, click the three-dot icon beside the reward and choose Publish. The same menu holds the other actions worth knowing:
- Edit, opening the reward and its set items
- Pin, which puts the reward in the floating box at the top right of the product page. Only one reward can be pinned at a time
- Duplicate, which copies the reward. This is how you build a tier ladder quickly
- Delete, available only for unpublished rewards nobody has ordered. It removes the reward but leaves its set items alone
Step 5: publish the rewards section on the page
Even with everything above done, during the preview stage the reward stays invisible until the rewards section in the Detailed description is itself published. It is unpublished by default on a crowdfunding draft. Creators lose hours to this one, because every toggle they can see says published.
| Gate | Where it is | Symptom if missed |
|---|---|---|
| Every set item published | Products, then the item, then its publish action | The reward cannot be published at all and the option is unavailable |
| The reward set published | Products, then Rewards, three-dot icon, Publish | The reward is missing from the page |
| Is published toggle | Reward settings, General info | The reward is missing from the page |
| Rewards section published | Project settings, Project details, Detailed description | Every reward is invisible during the preview stage, however it is configured |
| Product is buyable set to yes | Reward settings, Availability | Visible but nobody can buy it. Locked to yes on reward sets |
Run through that table in order before you email support. It resolves almost every "my perks are not showing" question.
Availability and stock, the settings that silently cap your revenue
- Product is buyable. Set it to no for an item you only want to exist inside a set. On reward sets it is always locked to yes
- Per-backer limit. Caps how many copies one backer can buy, and a backer over the limit cannot get through checkout. It cascades: a limit on one set item limits the whole reward
- Display remaining stock to users. Shows the remaining count on the product. Scarcity that is real converts, so use it on genuinely limited tiers
- Product availability in locations. Unlimited, a blacklist, or a whitelist
- Product stock. The global limit. Past it the product stays visible but reads as out of stock. This also cascades: if a set item has a smaller stock limit than the reward, the smaller limit wins
That last cascade is worth checking twice. A reward capped at 500 that contains an item you set to 50 sells out at 50, and the dashboard will not explain why.
How rewards are ordered on the page
Rewards are displayed sorted by price, lowest to highest, and that order cannot be changed. The only lever you have is the pinned reward, which sits at the top. Set items inside a reward can be reordered by dragging.
Price your tiers knowing this. If you want a particular tier seen first, either pin it or price the ladder so it lands where you want it. There is no manual sort.
Add-ons, and whether to allow add-on-only pledges
Add-ons are products sold separately rather than bundled into a reward: accessories, expansions, extra copies, anything additional to the main product. They are built under Products, then Add-ons, with the same settings as reward items.
One setting deserves a decision rather than a default. Under Project settings, then Orders, you control whether a backer can check out with add-ons only, meaning no reward in the basket. Many creators turn this off, so a backer sees a warning and has to add a reward. Turning it on raises average order value from existing backers but lets people buy an accessory without ever buying the product. For most physical-product campaigns, off during crowdfunding and on during the pledge manager is the sensible split.
Options: size, colour, language
Options are how you handle variants without creating a separate reward for every combination. Open a product, choose Options in the settings menu on the left, and add an option such as Size, then add its values, such as small, medium and large. Each value can carry its own SKU, and when you generate a report the selected option SKUs are combined and appended to the product SKU, which is what makes a variant-heavy project fulfillable.
A value can also carry a price increase, so an XL shirt can cost two dollars more than the base price without being a separate product. Options can be reordered by dragging, renamed, or deleted.
Two constraints matter. Options work only on items defined as pieces, not on items defined as sets, so a reward set itself cannot carry an option, only the items inside it. And once a backer has added an option or value to a pledge, you cannot remove it. Build your option structure before launch, not during.
Product groups, visibility and group discounts
Product groups control which backers can see which products. Go to Products, then Product groups, and add a group. Open its details, add products to it, then add a user group under Limit visibility. From that point the product is visible only to the backer groups you named.
The same screen carries discounts, so a group can see a product at a price nobody else gets. In practice this is how you run an early bird tier that stays genuinely restricted, reward a pre-launch follower list, or give a retailer group access to a bulk item that never appears on the public page.
Importing products in bulk
Building thirty rewards by hand is a bad use of a launch week. Under Products, choose Rewards or Add-ons, click the three-dot icon, and choose Import products. You decide whether the file overwrites existing products or skips matches and adds only what is new, tick the acknowledgement, and import. A summary appears afterwards and can be downloaded as a spreadsheet.
The import file takes an ID you assign yourself, a Parent ID left empty for the system to generate, a name, a type set to Set for a reward, a category, a published flag, and a regular price. Export first, edit the file, and import it back, rather than writing one from scratch. Our reward strategy guide covers how to structure tiers for margin rather than just how to enter them.
Follower gifts, the closest thing to the old reservations
The follower gift is how you turn a draft page into an audience-building tool. Before launch, someone clicking Follow on your project can be offered one of two things: a discount applied to their pledge at checkout, or a free item added to their pledge.
The detail that catches people out is that the gift is only ever delivered to followers who go on to pledge during crowdfunding. Clicking follow is not enough to receive it. That is what makes it work as a conversion mechanism rather than a giveaway.
Set it under Project settings, then Project details, then Follower gifts. If you choose a discount, enter the value. If you choose an item, publish the item first or it will not appear in the search. And note the lock: once the campaign draft is published, the gift cannot be edited, unless you had not added one at all, in which case you can still add one.
Indiegogo recommends running the draft page for at least a month before launch to accumulate followers, and every follower receives an email for every published update and for the campaign launch itself. That email list is the closest replacement for the discontinued reservations feature, and building it is the single highest-leverage thing you can do in the weeks before launch. Our pre-launch strategy guide covers how to fill it.
Project FAQ
The FAQ section lives under Project, then Communication, then FAQ. Add as many question and answer pairs as you want. It is worth populating properly, because every question you answer on the page is a question that does not arrive as a message during your busiest week, and the answers are indexed along with the rest of the page.
Stretch goals
Set these in Project settings, then Stretch goals. There are two kinds. Manual stretch goals you unlock by hand and can be anything you choose. Automatic ones unlock themselves against a target you pick: number of backers, amount collected, or campaign day. Each needs a name, an image and a description, and can be published or unpublished at any point until crowdfunding ends. The full list appears in your project description, and the next goal to unlock is displayed near the top of the page beneath the amount raised.
Stable Pledge and Stretch Pay
Stretch Pay lets backers split a pledge into instalments. You set the number, between two and ten, and the minimum pledge value that unlocks the option, which includes tax and shipping. Enable it in Project, then Settings, then Stretch Pay. It can be switched on at any time during the campaign and also during late pledge and the pledge manager. Turning it off later does not affect pledges already on an instalment plan; those continue on their existing schedule.
Stable Pledge is covered in section 7, because it belongs with the payment discussion rather than with product setup. It has to be switched on before crowdfunding launches, so decide on it while you are building.
Tester mode, which you should use
Tester mode is the most underused feature on the platform. Assign the tester role in Project Settings, then Testing, either by inviting an email address or by promoting an existing user under Users, then User List. The tester enters test mode from the client panel and a pink bar confirms they are in it.
In test mode you can place orders at any project stage, choose which phase to preview (crowdfunding draft, crowdfunding campaign, late pledge, pledge manager), view the page as a specific user group, and see unpublished content. At checkout no payment data is required, because test orders are never sent to the payment provider. Find them afterwards in the admin under Orders with the "Is test order" filter applied.
Run a full test purchase of every reward tier before you launch. It is the cheapest way to find a broken shipping rule or a mispriced add-on.
4) Publishing the preview and getting through review
There are two separate gates, and creators frequently conflate them.
Gate one: publishing the preview
You publish the project preview yourself. No Indiegogo approval is needed. What blocks you is the required-steps checklist on the project dashboard, of which business onboarding is the significant one. The dashboard lists what is missing; each completed step turns purple. Once all are done, click Publish project preview.
Gate two: campaign review
Going live does require Indiegogo to verify the campaign. Complete the required steps, set a launch date, then click Submit for launch.
- Review takes up to three business days
- Your launch date must be at least seven days from the moment you submit for review
- You can keep editing the project while it is under review
- If approved, a countdown appears on the preview page and the campaign starts automatically at the set time
- If rejected, you are told what to fix and can resubmit
- Launch time follows your device's time zone, so check it if you are travelling
If you genuinely need to launch inside seven days, contact Indiegogo and ask them to set the launch date manually. They review the request rather than granting it automatically, so do not build a plan around it.
Practically, this means the last possible moment to submit is ten days before you want to go live: seven days of mandatory lead time plus three business days of review, and business days mean a Thursday submission can easily become the following Tuesday. Our campaign planning guide works backwards from launch day properly.
5) Fees, payouts and what actually reaches your bank
Crowdfunding fees
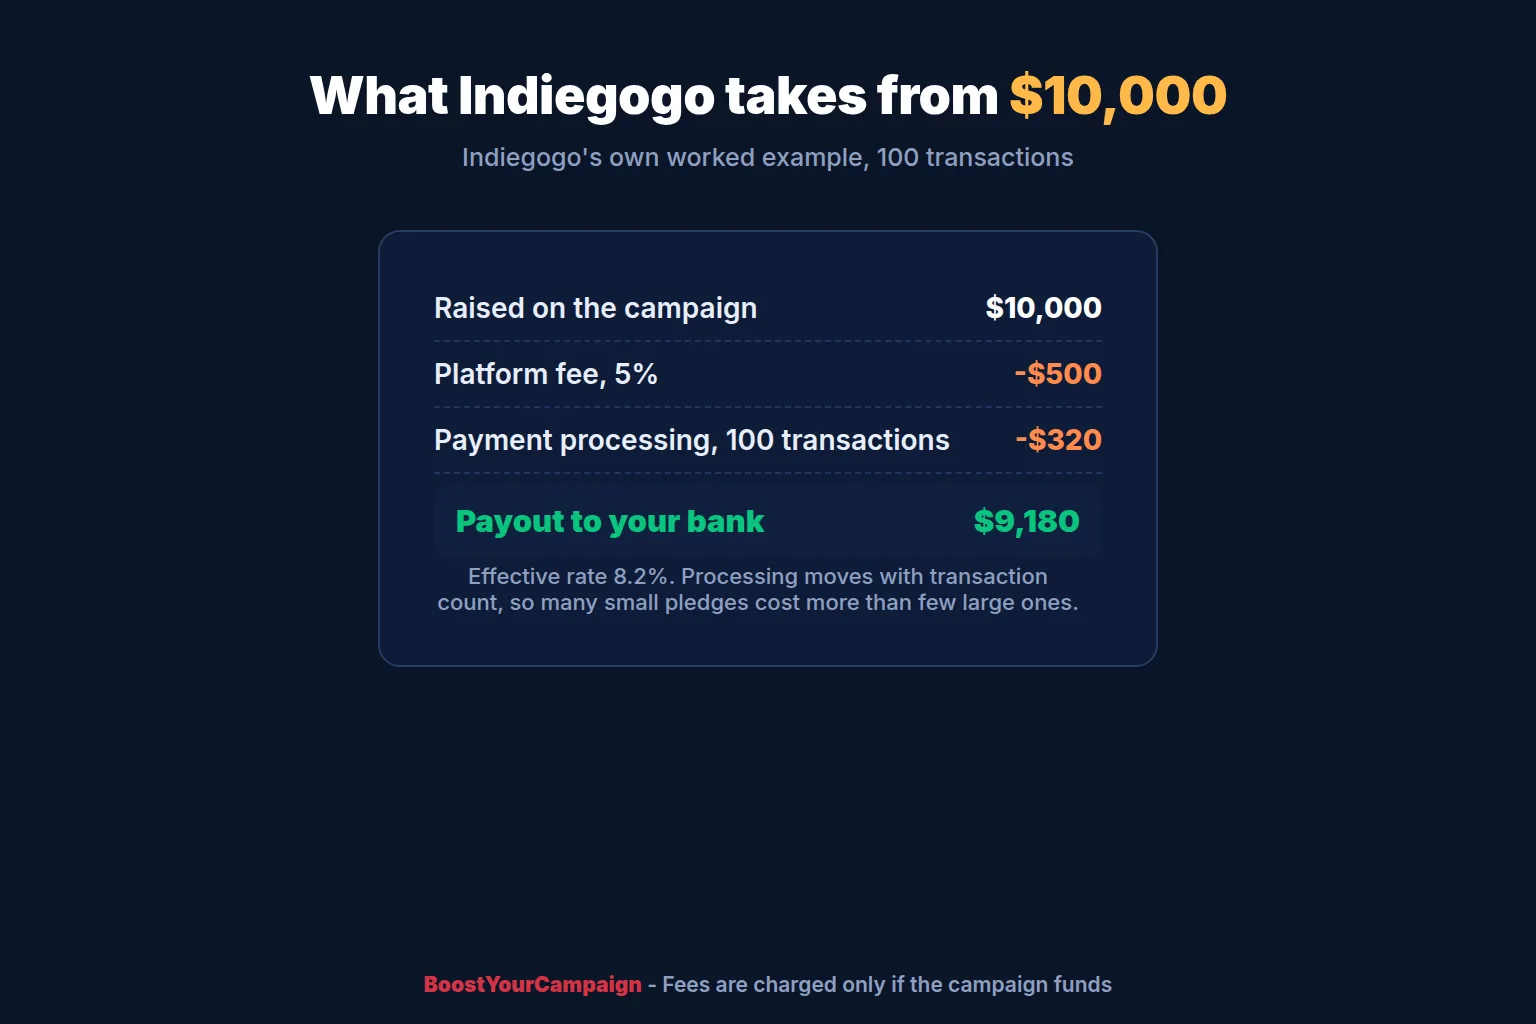
Indiegogo charges a platform fee of 5% of the amount collected, plus payment processing, which is a fixed fee per transaction in the project currency. If your project does not reach its goal you pay nothing at all, including no payment processing.
Indiegogo's own worked example: a project raising $10,000 across 100 transactions pays a $500 platform fee and $320 in processing, leaving a payout of $9,180. That is an effective rate of 8.2%, and the processing component moves with your transaction count, so a campaign with many small pledges pays proportionally more than one with fewer large ones.
Pledge manager fees
There is no separate charge for using the pledge manager. Indiegogo takes 5% of each successfully collected payment plus a fixed processing fee of 3% + $0.20 per transaction in the project currency.
When the money arrives
This applies to campaigns launched after the October 2025 migration, which run on Adyen.
- Funds paid by backers reach your Adyen account three to five business days after collection
- Adyen pays out to your bank weekly, each Friday night, between midnight and 2am CET
- Payments continue processing for up to two weeks after the campaign ends, so expect several payouts rather than one
Indiegogo's example: a campaign ending Thursday 2 December sees funds credited to Adyen on Tuesday 7 December, the first payout initiated Friday 10 December, the next the following Friday, and the final one on 24 December if payments were still processing on the 16th. Because the payout runs overnight CET, depending on your location it lands Friday or the following Monday.
Budget on that basis. The gap between a campaign closing and money being usable is a fortnight or more, and manufacturing deposits rarely wait. Our cost breakdown covers the full picture of what a campaign consumes.
Reading the finances screen
If you hold the Owner, Admin or Invoicing manager role, Project, then Finances, is where the money actually lives. The full reporting set is only available on campaigns launched after the 16 October 2025 migration. Five numbers matter.
| Field | What it is |
|---|---|
| Pending balance | Sales and refunds the payment providers are still processing. These move into the current balance within five days |
| Confirmed balance | Settled transactions ready to be paid out. It can still move as payments, cancellations and adjustments continue |
| Reserve | An amount you choose to hold back from the confirmed balance as a buffer for refunds. You set it yourself on this screen |
| Next payout | The amount and the date of your next transfer |
| Payout history | Past payouts, each expandable to the list of individual transactions bundled inside it |
Set a reserve. Refunds arrive after the money has left, and a creator who has paid a manufacturing deposit with the entire balance has no way to honour a refund request without reaching into their own pocket. A reserve of a few percent costs nothing and removes the problem.
Exports for your accountant
Every transaction can be filtered under Transactions and exported to a spreadsheet, and individual payouts can be opened to see exactly which orders made them up. Separately, Orders, then Payments, exports order-level payment detail including platform fee, payment processing fee, currency and tax. That export contains only completed payments.
The payment statuses in that export are worth learning, because they answer most of the questions creators send to support:
- Incomplete: payment started but not finished, in the pledge manager
- Completed: paid, in either crowdfunding or the pledge manager
- Deferred: the backer has given payment details but the provider has not collected yet, during crowdfunding
- Deferred with error: a crowdfunding payment that hit an error
- Canceled: cancelled by the creator at the backer's request
6) Tax, and the EU VAT change you need to know about
This is the most consequential recent change on the platform and the one least reflected in third-party guidance.
Indiegogo paused EU VAT support on 4 August 2026
Indiegogo no longer applies EU VAT automatically to contributions. The change applies to new campaigns and to campaigns where EU VAT had previously been enabled.
- Existing campaigns: EU VAT already collected by Indiegogo is transferred to the creator. EU tax rates stay available in campaign settings so you can adjust them to absorb the tax for backers or issue refunds
- New campaigns: EU VAT is not enabled. Default tax rates for EU locations are unlocked and preconfigured to the applicable rate for each EU country, regardless of where the creator is based, and can be edited before the campaign starts
- UK VAT is unchanged. Indiegogo continues to support it as before
The practical consequence: EU VAT is now your responsibility, not the platform's. If you have meaningful European backer numbers, you need to decide whether to price VAT into your reward, add it at checkout through the tax settings, or handle it at import. Getting this wrong means either eating the VAT out of margin or surprising European backers with a bill at the door, which is where most negative delivery reviews originate.
Tax rates for any project are reviewable under the Locations and Sublocations tabs in Shipping and Taxes settings. Our guide to EU VAT and customs covers the options in detail, and our EU fulfillment service exists partly to make this someone else's problem.
7) Payment methods your backers can use
This is a genuine advantage of the post-migration platform and a reason to look again if you dismissed Indiegogo previously. Campaigns launched after 16 October 2025 accept:
| Method | Currencies | Countries |
|---|---|---|
| Visa, Mastercard, Diners, Discover, JCB | Any | Any |
| Apple Pay, Google Pay | Any | Any |
| Klarna Pay Now | CHF, EUR, SEK | BE, NL, DE, SE, AT, CH |
| iDeal | EUR | Netherlands |
| Bancontact and Bancontact app | EUR | Belgium |
| Blik, Online Banking PL | PLN | Poland |
| Carte Bancaire | EUR | France |
| EPS | EUR | Austria |
| Multibanco | EUR | Portugal |
| MobilePay | DKK, EUR, NOK, SEK | Finland, Denmark |
| TWINT | CHF | Switzerland |
| Trustly | CZK, DKK, EUR, GBP, NOK, SEK | EE, NO, SE, FI, CZ, DK, SK, LT, LV, GB, ES |
Campaigns that launched before 16 October 2025 remain limited to credit and debit cards, Apple Pay and Google Pay. Which methods appear on a given order depends on the backer's country and the transaction currency, and are shown at checkout. Payments are processed by Adyen or Stripe depending on when the campaign launched.
If a meaningful share of your audience is in the Netherlands, Poland, Belgium or the Nordics, local payment methods materially improve conversion against card-only checkout. That is worth weighing when choosing a platform.
Instant payments, and why they behave differently
Most of the local methods above are instant payments rather than deferred card authorisations. The money moves at the moment of pledging instead of being collected when the campaign closes, which changes how refunds work during the campaign.
During crowdfunding, a backer who paid instantly can ask the creator to cancel, and the creator refunds 100% of the funds. There is no cost to the creator for doing so, because Indiegogo covers the payment processing fees on those refunds. Partial refunds are not available at this stage, only full ones.
The funds themselves sit in a dedicated Adyen account which the creator can reach only to issue a refund through the platform. They are paid out only after a successful campaign end, so an instant payment is no more available to you early than a card pledge is. If the campaign fails, those backers are refunded like everyone else.
In late pledge and the pledge manager, instant payments are simply another payment option, paid upfront, with refunds and cancellations governed by your own project rules.
Currency conversion
Backers paying in a currency other than the project currency can use Indiegogo's own converter instead of letting their bank do it. The platform uses the recent ECB rate plus 2.8%, and the price shown at checkout is the price charged, with no separate processing fee added afterwards.
This exists because bank foreign transaction fees are unpredictable. Some cards add more than 5%, some travel cards add almost nothing, and the fee may be charged separately or buried inside the exchange rate. The prices you set in the project currency stay fixed and are the base for every conversion. For a creator this is one less reason for an international backer to abandon a checkout, and it is worth a line in your FAQ.
Stable Pledge
Stable Pledge is a refund guarantee you can opt into, and it is not about currency. Under the programme, if you change a price estimate after the campaign ends, shipping cost being the usual one, by more than 10% against your original estimate, every affected backer gets two weeks to request a full refund. Indiegogo refunds its own 5% fee on each pledge you compensate. The creator remains solely responsible for the refunds themselves.
Three rules govern it. You join from the project dashboard by clicking Join Stable Pledge, and you can only do so before crowdfunding launches. Once you have joined you cannot leave. And the price change has to be announced in an Indiegogo update with email notifications sent to all backers, which is what starts the two-week clock.
Whether to join comes down to how confident you are in your shipping numbers. A campaign with a fully quoted freight plan and a finished product has little to lose and gains a visible trust badge on its page. A campaign that is guessing at shipping a year out is taking on real risk. Get your shipping quoted properly first and the decision answers itself.
8) Running the live campaign
Endgame
Endgame extends the final countdown while pledges are still arriving. Every pledge made in the closing moments extends the timer by up to ten minutes, and each new pledge or upgrade resets it back to ten. Each backer can only extend it once, whether by pledging or upgrading.
It is enabled by default and works on campaigns that have not yet reached their goal as well as funded ones. You can turn it off at any point, including while it is running, under Project Settings, then General. If you do turn it off, tell your backers in an update beforehand so nobody misses their window expecting extra time.
Updates, and the button people forget to press
Updates live under Project, then Communication, then Updates. You write a title, an abstract and the body, pick the audience, and optionally attach an image or a poll. Preview it, toggle Published, and save.
Here is the part that costs campaigns money: publishing an update does not notify anybody. It appears in the updates section of your project and nothing else happens. To send the emails you go back to the update list and click Send notifications, which goes out to whoever you named as the target audience, whether that is everyone, backers only, or a specific backer group. Sending takes a while, so do not panic if your own test address is slow to receive it.
Update statistics
The update list carries per-update statistics, and they are more useful than most campaign dashboards. For each update you see total views, likes and comments, how many notification emails were sent, how many were opened, how many were clicked, and how much funding the update influenced.
Read that last figure carefully. The system attributes a pledge change to every update a backer viewed within the same session, so if someone reads three updates and then upgrades, all three are credited with the full value. The numbers are directionally useful for working out which update format lands, and they should not be summed.
Polls
Polls attach to updates and are set up under Project, then Communication, then Polls. Add a question and answers, choose which backer group can vote, and decide whether results are visible to everyone or only to people who voted. Attach it to an update from the update settings and set it active, or nobody can vote.
Once a poll is open and a single vote is in, you can no longer add or delete answers or change the voting group, though you can still fix a typo in the wording. Setting Is active back to no closes voting and displays the results.
Polls are the cheapest engagement tool on the platform. A stretch goal colourway vote or a sleeve-material question gives backers a reason to open the email and a reason to feel involved in the decision.
Comments and moderation
All comments across all your projects appear under Creator, then Comments, and per project under Project, then Comments. Each is tagged with where it came from, whether an update or the comment section, and links to the backer's profile. You reply directly from there.
Comments are auto-tagged with a language by the platform, and you can filter by language, search by phrase or nickname, or filter by date range. For a campaign with a multi-language backer community, that filter is how a German-speaking moderator finds their queue without reading everything.
Access is available to anyone with the Admin or Moderator role, so you can hand comment duty to a team member without giving them the project.
Creator Digest
Creator Digest is an email summary across all your projects covering new and cancelled pledges, follower count changes, new comments, and the most active discussions. Anyone with a creator-level role can receive it. You set the frequency under Creator Account Settings, then General settings, then Creator Digest: daily at midnight UTC, weekly at 2am UTC on Mondays, or monthly at 4am UTC on the first. The frequency applies to every recipient rather than to you alone, and individuals can unsubscribe in their own communication preferences.
Analytics and ad tracking
Your Facebook Pixel ID and Google Analytics ID go into the campaign settings under Analytics and tracking. Meta's Conversions API is also supported: generate an access token in Events Manager under your pixel's Settings tab, in the Conversions API section, then enable Conversion API in the same campaign settings tab and paste the token in.
The platform fires five events into Meta:
| Backer action | Event |
|---|---|
| Views the project page, web or app | ViewContent |
| Follows the project, from anywhere | AddToWishlist |
| Adds any product to cart, reward, add-on or tip | AddToCart |
| Enters checkout from the project | InitiateCheckout |
| Backs successfully and lands on the thank you page | Purchase |
Run both the pixel and the Conversions API. With both live, data is sent server-side and the pixel is effectively superseded, which is the point: browser-side tracking loses a meaningful share of conversions to blockers and privacy settings, and an ad account optimising on incomplete data spends badly. Our Kickstarter ads guide covers what to do with the signal once it is arriving.
What you cannot change, and when it locks
This catches people out badly, because the locks are cumulative and some are permanent.
| Stage | What can no longer be changed |
|---|---|
| Before publishing the preview | Link to your creator page |
| After publishing the preview | Project URL, project visibility, follower gift or discount if already selected |
| After setting launch date and time | As above |
| After launching crowdfunding | All of the above plus the funding goal, the preview page detailed description, and products cannot be unpublished or have their buyable status changed once anyone has added them to a pledge |
| Before the pledge manager publishes | All of the above plus the campaign page detailed description and all rewards |
Two of these deserve emphasis. Your project URL locks the moment you publish the preview, so decide it deliberately rather than accepting a default built from a working title. And the funding goal locks at launch, which is the single strongest argument for setting a goal you are confident of clearing and using stretch goals above it rather than setting an ambitious headline number you cannot revise.
9) Referral links and tracking what works
Referral links are how you find out which of your channels actually produced pledges rather than clicks. Create them under the tool button in the top right, choose the project, then Project, then Referral links, then Add a referral link.
Each link carries:
- Display name, internal only, so name them in a way you can filter later
- Status, active or inactive, changed from the three-dot menu. An inactive link stops working entirely
- New orders, the count of orders through that link. Later changes to an order do not alter this
- 1 day and 7 days, pledges made within 24 hours and within 7 days of the click. The 7-day figure includes the 1-day pledges
- Income, all pledges through the link with no time limit, excluding pledge reductions
- Total, the same but including reductions
How attribution actually works
Attribution is last click. Links overwrite each other, so a backer who clicks your newsletter link and then your Instagram link is credited to Instagram. Attribution attaches to a logged-in user or to a cookie: a logged-in backer is tracked across devices, an anonymous one is tracked by cookie for up to 28 days in the same browser. Cancelled pledges are reflected in the data.
Two practical consequences. Create a separate link for every channel and every major send before you launch, not afterwards, because a pledge that happens before you make the link is untracked forever. And read last-click numbers knowing they systematically under-credit whatever introduced someone to the project and over-credit whatever reminded them at the end, which is usually email.
Pixels and analytics
The platform supports Facebook CAPI as well as the standard Pixel, which matters because browser-side tracking has been degrading for years and CAPI is server-side. Facebook Pixel ID and Google Analytics ID both go into the project settings. Official badges and logos for social use are provided if you want campaign assets that look native to the platform.
10) After the campaign ends: the fifteen-day collection period
The campaign closing is not the end of collection, and this is where creators most often misread their own numbers.
When crowdfunding ends, a payment collection period of up to fifteen days begins. During it, Adyen collects payments, backers can update or change their payment method, and the system retries failed payments up to three times.
When that period ends, unpaid orders are handled one of two ways depending on your project configuration: moved to Awaiting payment, or cancelled outright.
For campaigns starting after 16 December 2025, unpaid orders are not cancelled by default. Backers can complete their original pledge later during late pledge or in the pledge manager. You control this under Project settings.
The reason this matters: your headline raise on the final day is not your collected raise. Some percentage of cards fail, and the gap between the two is real money. Leaving unpaid orders open rather than cancelling them gives those backers two further chances to pay, which is almost always the right choice.
11) Late pledge and the pledge manager
These are two distinct stages and you do not have to use both. If you are searching for the old name, Late Pledge (formerly called InDemand) is the stage that continues collecting money after crowdfunding closes, and it works differently now from the feature that carried that name before the migration.
Late pledge
Optional. You collect pledges after funding without defining shipping costs or collecting shipping details. There is a fifteen-day gap between crowdfunding ending and the earliest possible late pledge launch, which aligns with the payment collection period above.
To open it you work through a checklist. Completing it enables the Submit for launch button, Indiegogo verifies the setup, and once approved you launch it yourself.
Pledge manager
The final stage. Backers confirm their product choices, provide shipping addresses, and pay anything outstanding such as shipping costs or added extras. You can skip late pledge and go straight here: from the project dashboard, choose Set up pledge manager and complete the required steps.
If you launch late pledge first, you can build the pledge manager in parallel and launch it later.
External campaigns
If you crowdfunded elsewhere, on Kickstarter for instance, and want only the pledge manager, that is an External Campaign. Choose the project from the tool menu, and once reviewed and accepted you publish it yourself with Launch pledge manager or Launch late pledge. This is a genuinely useful option: Indiegogo's pledge manager is now competitive with standalone tools, and for a Kickstarter creator it is worth pricing against the alternatives. Our pledge manager guide compares the options.
Pledge manager reminders
A share of your backers will not complete the pledge manager without chasing. The platform has built-in reminders for exactly that, and you should use them rather than writing manual updates, because reminders target only the people who have not finished while updates go to everybody.
Closing the pledge manager: the soft-close
A soft-close is a controlled end to the pledge manager stage. Once it happens, backers can no longer make a new pledge, add products to an existing order, edit a pledge, or change a shipping address. Unlike a permanent close it can be reversed, and you can reopen the pledge manager later from project settings.
Set it under Project settings, then General settings, then Pledge manager scheduled end. Enter a date and time and save. Setting a date is optional, you cannot set one in the past, and you can change or clear it as often as you like right up until the soft-close happens. The same date appears in the Timeline view but cannot be edited there. Once scheduled, backers can see the date, which is exactly why you would set one: a visible deadline is what moves the people who have been meaning to get round to it.
When the scheduled date is fourteen days away or less, a reminder appears on your project dashboard. Push the date further out and the reminder disappears until the new date is close.
Automatic soft-close, and what happens if you do nothing
If you never set a date, the platform will eventually set one for you. After six weeks of inactivity Indiegogo schedules an automatic soft-close and notifies you. Any new activity on the project removes that automatic date. If the soft-close then happens, there is a reopen period during which backers cannot pledge or make changes but you can still reopen the pledge manager. If it stays closed, Indiegogo sends a hard-close notice, and at the end of that period the project reaches its final close.
The practical advice is short: close it deliberately. Use the soft-close when you want a clear deadline and might still need to reopen, for example to lock orders before production while keeping the option of a late addition. Do not let the automatic one arrive by surprise, and export everything you need before you close: backers, pledges, payments, and your shipping data. Recovering an export after a close is a support ticket you do not need.
12) Shipping setup
Shipping configuration is the most intricate part of the platform and the part most worth testing before launch. Everything lives under Project, then Settings, then Shipping and taxes. You can set it up after a successful campaign, or straight away if you are running a pledge manager for a project crowdfunded elsewhere.
Costs are calculated in one of two modes, by weight or by quantity, and both are built on the same two foundations: shipping models and shipping zones.
Shipping models
A shipping model is a set of options presented to the backer. It might be a courier, a postal service, a specific hub, or local pickup. You can create as many as the project needs, and each one can price differently.
Per model you control:
- Name, which backers see at checkout, so make it recognisable rather than internal shorthand
- Is default, preselecting this model at checkout
- Is enabled, which you can toggle at any time, for instance switching off local pickup when it is not practical
- Minimum shipping cost, applied when the calculated cost plus handling comes in below it
- Handling fee, added on top of the calculated cost as either a percentage or a flat amount per order. Note that the minimum shipping cost is not considered when handling is calculated
- Volumetric weight, which compares actual and volumetric weight and charges the higher. This requires dimensions on every product
Turn on volumetric weight if you ship anything bulky and light. A board game box or a lampshade costs a courier by the space it occupies, and a model priced on actual weight alone will lose money on every one of them.
Locations and shipping zones
Zones define where each model is available, and they are the required next step after creating models. The Locations tab shows which countries sit in which zone, whether each is enabled, and the tax rate that applies. Locations are preset by continent.
You can disable any country you do not want to ship to. A cleaner approach many creators use is to create a zone called "no shipping", put every excluded country in it, and switch that zone off in each model.
Sublocations are US states and Canadian provinces, and they can be handled individually. You can choose which states, provinces or APO and FPO addresses you ship to, assign custom tax rates per state, and use Zone Override to pull one state out of the main United States location and charge it differently. That is how you handle Alaska and Hawaii without over-charging the lower 48.
Zone names and descriptions are internal only, so name them for your own clarity. Backers never see them at checkout.
By weight or by quantity
By weight is the straightforward mode: you set weight ranges per zone and the system prices the order against its total weight.
By quantity prices against how many products a backer orders, which suits projects shipping multiples of a similar item. It runs on shipping cost rules, created under Shipping and taxes, then Shipping cost rules. Each rule has an internal name and description, most creators naming the rule after the product it applies to, and a behaviour type that determines how it interacts with everything else in the order.
| Behaviour | What it does | When to use it |
|---|---|---|
| Neutral | Keeps a product on quantity calculation when that product is set to by quantity | The default choice for projects shipping by quantity |
| Forces by quantity shipping | A strong rule. Forces the product, and possibly others in the same order, onto quantity calculation even if they were set to by weight with their own rule | When cost must rise with every added unit regardless of what else is in the basket |
| Conditional shipping costs | A weak rule setting a minimum for small orders. Products may still calculate by weight if every product in the order also uses a conditional rule | Small items that ride along free with a bigger order but need a charge when bought alone |
Hubs, stages and stock
Shipping hubs are physical origins. Create them under Shipping and taxes, then Shipping hubs, and assign zones to them. Every zone starts in the default hub, and assigning a zone to a new hub moves it out of the default. If you never create a second hub, the default ships everything.
Once hubs exist, stock is managed per hub rather than at product level, under Products, then the product, then Stock. You can switch between hubs to set how many units ship from each. This is the setting that matters if you are splitting inventory between a US and an EU warehouse to avoid cross-border duty on every parcel. Our US fulfillment and EU fulfillment services exist for exactly that split.
Shipping stages handle multi-wave shipping, where part of an order goes out before the rest. A model's order availability setting then decides whether it applies to all orders, to orders with at least one item in a stage assigned to that model, or only to orders where every item belongs to such a stage.
Product availability by location
Each reward and add-on carries an availability setting with three options: unlimited, a blacklist of locations where it is not available, or a whitelist of locations where it is the only place it can be bought. A bar at the top of the project page shows the backer their delivery country, detected from their browser settings.
One behaviour to warn backers about: if a product is already in someone's cart and they change their delivery country to one where that product is not available, they cannot add it, and they get a message explaining why. It looks like a bug to a backer who does not know the rule.
Check your rates before you launch
Use the shipping calculation tool under Shipping and taxes, then Shipping calculation. Search for a product, add it, and click Calculate. The results table shows cost per model and per zone. A dash means that zone is excluded from that model. A zero means the cost is set to zero, which needs your attention unless you genuinely intended free shipping there.
Run every reward through it, in every zone you ship to, before launch. It takes an afternoon and it catches the errors that otherwise surface as a five-figure shortfall at fulfillment. Our shipping cost calculator gives you per-region estimates before you set rates at all.
Then set shipping before launch and state it on the project page. Backers who discover a shipping cost at the pledge manager stage, months after pledging, are the ones who cancel.
13) Managing pledges, refunds and cancellations
Day-to-day order management lives under the admin area.
Refunds and cancelling an order
There are two situations: cancelling a whole paid pledge, and refunding part of one. For a full cancellation, open Orders, then Order list, find the order and click its ID, then use the three-dot button in the top right and choose Cancel order.
The window that follows shows the order ID, the overcharged amount, what will be refunded, the order date and the payment type, and gives you two decisions:
- Handle this refund outside Indiegogo. The payment is not reversed automatically and you settle it yourself by bank transfer or otherwise. Use this only when you have a reason to, because it moves the record-keeping burden onto you
- Apply processing fee. Deducts the transaction fee from the refund, so the backer receives less than 100%. Decide your policy on this before the first request arrives, and state it in your refunds and cancellation section, because doing it case by case is how a campaign gets a reputation
Click Next for a summary including the fee, then Confirm.
Editing an order, and creating one from scratch
To edit, open the order and click Edit order in the top right, make changes, then click Confirm and confirm again at the summary. If the backer has changes of their own sitting unsubmitted, such as unpaid items in their cart, you are told so and can choose whether to take them into account. You can also view the edited order before committing, which is how you let a backer assemble a change that you approve later. Significant changes trigger an email to the backer automatically.
After crowdfunding ends you can also build an order from nothing. Under Orders, then Order list, click the three-dot button and choose Create order, then enter the backer's email. If that person already has an order you are told, and you choose between a second order and editing the existing one.
Exports, and the filters that matter
Three different exports live in three different places, which is the usual reason people think data is missing.
| Export | Where | Notes |
|---|---|---|
| Backers | Users, then User list, tick rows, three-dot icon, Export selected | Filter by group, order date and range, credits left, exact nickname or backer number. Exports as .xlsx |
| Pledges | Orders, tick rows, Export above the list | Filter by ID, customer, email, stage, payment status or product. CSV or Excel |
| Payments | Orders, then Payments | Completed payments only, with fees, currency and tax |
| Products | Products, then Rewards or Add-ons, three-dot icon, Export all products | Always exports everything, rewards and add-ons together, and emails the project address when done |
| Transactions | Project, then Finances, then Transactions | For reconciliation, exportable to Excel |
Two practical notes. To export everything rather than a selection, you have to clear all filters first, then tick the box in the header row. And the pledge export offers a Clean output option that strips diacritics, turning names like Bakżewicz into plain ASCII. Turn that on if your fulfillment partner's system chokes on accented characters, and leave it off if you want backers' names spelled correctly on the parcel.
Apple Private Relay addresses
Backers using Hide My Email pledge with an @privaterelay.appleid.com address, and those addresses break a pledge manager import. Handle it before you import: filter those addresses out of the file, contact those backers for a real address, substitute them in, then import. If you do not want to wait, remove them from the import file, import everyone else, and bring them in later once you have their addresses.
If you have already imported them, it is a support job. Filter them out, collect the real addresses, and send the list of Private Relay addresses to your Indiegogo business support contact, because those pledges and user records have to be removed on their side before you can import the corrected file.
- Editing pledges and creating a new order for a backer directly, useful when someone has emailed you rather than sorting it themselves
- Importing pledges, essential for external campaigns bringing backers across from another platform
- Exporting pledges and backers for fulfillment, and exporting payment details and enhanced reconciliation reports for accounting
- Changing order shipping stage, which is how you track fulfillment progress within the platform
- Order cancellation and refunds, processed from the order itself
- Adding a discount to an order, for service recovery
- Backer groups, which you create and edit to segment communications or restrict product visibility
- Pledge manager reminders, which chase backers who have not completed their details
Two smaller things worth knowing. Apple Private Relay email addresses need specific handling, and the platform documents how. And adding users to a project with defined roles and permissions lets you bring in a fulfillment partner or an agency without handing over your whole account.
Pledge and payment statuses
Backers ask what a status means more often than they ask anything else, so it is worth having the list to hand. A pledge carries a pledge status and a payment status, and they move independently.
| Status | Meaning |
|---|---|
| Pledged | The backer pledged and will be charged once the campaign funds |
| Placed | The order is complete, shipping details included, and ready to proceed |
| Preparing for shipping | Being prepared |
| Ready for shipping | Packed and about to ship |
| Partially shipped | Part of the pledge has shipped |
| Shipped | Shipped |
| Completed | The creator has completed the pledge |
| Canceled | Cancelled, and the backer was not charged |
| Status | Meaning |
|---|---|
| Awaiting payment | Not paid |
| Paid | Paid in full |
| Partially paid | Part of the pledge is paid. The backer either removes the unpaid items or pays the balance |
| Scheduled | Being charged on a Stretch Pay instalment schedule |
| Scheduled and awaiting payment | On an instalment schedule, with products added after crowdfunding still awaiting payment |
Moving orders through fulfillment
Order stages are how you track fulfillment inside the platform. Go to Orders, filter by Stages to find the group you want, tick the header box to select them all, and click Set shipping stage. Choose the new stage, optionally add a public note that backers see, such as a shipped confirmation, and a private note for your own records, then update.
That method sets one stage for one batch. To move several batches into different stages at once, export the orders you want, edit the file, and use Upload stage changes. The upload needs the order ID or order code copied from the export, which is why exporting first rather than writing a file from scratch is the only sane approach.
Importing pledges from another platform
For an external campaign you bring your backers across under Orders, then Import pledges. Each imported backer can be marked as an Original backer, meaning they came from the external crowdfunding platform, or as a Late pledger, grouping them with everyone who arrives organically afterwards. You can then filter on that under Users, then User list, or target updates at one group and not the other.
Leave the Default group for late backers and give your original backers their own group. It takes thirty seconds at import time and it makes every later decision easier, from who gets a specific update to who can see a backer-only add-on.
The import file needs a backer name and an email as a minimum, with the backer number optional. Names must be the full name without numbers or special characters. A Kickstarter export can be used directly once some rows are removed, and Indiegogo publishes an example file showing exactly which. Private Relay Apple ID addresses need the separate handling noted above.
Backer groups
Groups are created under Users, then User groups. Add a group, then go to Users, tick the people you want, click the three-dot icon and choose Set groups. A person can belong to several groups at once.
Groups drive four things worth planning around: which products a backer can see, what discount they get, which updates reach them, and which shipping models are available to them. Create them before you import anyone, because retro-fitting groups onto three thousand imported backers is a job nobody enjoys.
Discounts on an individual order
For service recovery, open Orders, then Order list, find the order, click Edit order, then Add discount. Enter the amount and a reason, save, and it appears as a line item on the order which you can delete again later. A five dollar discount is often a cheaper answer to a shipping complaint than a refund and a re-ship.
Collaborators, roles and permissions
Invite a collaborator under Users, then User list, then Invite collaborators, entering an email and choosing roles. Alternatively open an existing person's profile, scroll to Project and creator roles, and add roles there. The distinction matters: creator roles give access to every project you run, project roles give access to one project only. Give an agency or a freelancer a project role.
| Role | Permissions |
|---|---|
| Owner | Everything: invoicing, credits, users, payments, orders, onboarding, settings, referrals, dashboards, submissions, publishing, comment moderation and campaign marketing settings, plus bulk order editing and order transfers. Carries the Creator tag next to the nickname |
| Admin | Edit project settings, manage users, orders and referrals, publish crowdfunding drafts, submit projects, access dashboards, moderate comments, view unpublished projects |
| Invoicing | Invoicing, payments, payouts, orders, project settings, users, project search, view unpublished projects |
| Credit manager | Credits, users, project settings, project search, orders |
| Onboarding manager | Edit and view onboarding, edit and view project settings, view orders, view user groups but not individual users, project dashboard, unpublished projects |
| Editor | Project configuration: settings, description, rewards, and comment moderation. No access to orders or users |
| Marketer | Referral programmes, campaign marketing settings, creator dashboards |
| Tester | Inspect future project stages, change page visibility for user groups, place test orders |
Every role above Tester inherits the Tester permissions. In practice, an agency running your ads needs Marketer, a fulfillment partner needs order access, and neither needs Owner. Scope access to the job.
Cancelling a campaign
A project still in draft does not need cancelling. You simply never launch it. If crowdfunding has started, go to Project, then Settings, and in General settings click the three-dot button and select Cancel project.
A cancelled campaign is permanently marked as cancelled and cannot be restarted. Relaunching means creating a new project from scratch, with a new URL. You can still post updates and talk to your followers afterwards, which is worth doing rather than going silent: a campaign pulled at day four and relaunched properly two months later is a normal story, and the people who followed the first one are your warmest audience for the second. Our campaign plan guide covers how to avoid needing to.
14) The questions your backers will ask you
A large share of the messages a campaign receives are backers asking about the platform rather than about your product. Answering them from the page, or pasting the answer back, costs you nothing and buys hours.
When will I be charged?
Only after a successful campaign, unless the backer chose an instant payment method, in which case they paid at the moment of pledging. Adyen keeps trying to charge cards for two weeks after crowdfunding ends. For a Stretch Pay order, a failed instalment is retried up to three times at 48-hour intervals. Until a charge succeeds the backer can change their card.
How do I change my payment method?
For one project: Your Dashboard, then Pledges and orders, then view your pledge on the relevant order, and the payment methods sit at the bottom of that page. If they are not visible, the backer has unsubmitted changes in the order and has to revert them first, which is the source of most confused messages on this topic. For the account as a whole, there is no standalone setting: the card is saved next time they pledge and tick save the card.
Can I cancel my pledge?
During crowdfunding, yes, and they will not be charged. Pledges and orders, view your pledge, three-dot icon, Cancel pledge. Once the campaign is over and the pledge manager has begun, cancellation goes through you, the creator.
The exception worth knowing: a backer who paid with an instant method such as iDEAL cannot cancel on their own. They have to go through Indiegogo's contact form under the refund category. Expect these to reach you first, and point them there.
Can I change my pledge in the pledge manager?
Yes, until you mark the order ready for shipping or shipped, or until you specifically restrict editing. They open Pledges and orders, view your pledge, and the editing icon. On an unpaid pledge they can add and remove items, change quantities and options, change the shipping address, choose a shipping method where more than one exists, and choose a payment method. On a paid pledge some of that may be locked.
One rule causes complaints: the pledge total cannot drop below what has already been paid. A backer stripping items out of a paid pledge hits an error at checkout rather than a refund.
How do I change my shipping address?
Pledges and orders, view your pledge, three-dot icon, Manage shipping, then scroll to shipping details, change them, Continue, and Submit your pledge to save. It is blocked once the order is marked ready for shipping, shipped or completed, and you can disable it earlier if you need addresses frozen for a fulfillment deadline.
Say when you are locking addresses, in an update, at least a week before you do it. Address changes arriving after a freeze are the most common cause of reshipped parcels, and reshipping is entirely at your cost.
What happens if the campaign does not fund?
Nobody is charged and the project is not funded. Instant payment backers are refunded like everyone else. There is no partial outcome any more, because Flexible Funding no longer exists.
Why can I not find a project I backed?
Usually because the pledge sits under a different email address than the one they are signed in with, which is common for anyone using Apple Hide My Email. Pledges and orders lists everything attached to the signed-in account.
Can I turn off these emails?
Partly. Under Communication preferences in the account menu, a backer sets push, email, both or none per project and per creator, across comment replies, community activity, general project messages and updates. They cannot unsubscribe from system messages such as pledge confirmations, status changes and payment errors, because those are needed to fulfill the pledge.
Worth knowing as a creator: your update notifications are something backers can switch off. If open rates on your updates fall through a campaign, some of that is unsubscribes rather than apathy, and it is an argument for running your own email list alongside the platform.
15) Common problems and how to fix them
| Problem | Why it happens | Fix |
|---|---|---|
| Bank document rejected | Adyen verifies strictly and masks, old dates and trading names all fail | Upload a full PDF bank statement from the last month showing the legal entity name and complete account number |
| Account number mismatch | What you typed differs from the document, even by a space | Correct the typed field to match the document exactly |
| Bank account belongs to a shareholder | Personal account used for a company campaign | Provide an account in the registered company name |
| Cannot publish the preview | Required steps incomplete, usually business onboarding | Work the dashboard checklist until every icon turns purple |
| Launch date rejected | Set fewer than seven days from review submission | Move the date out, or contact Indiegogo to request a manual override |
| Rewards invisible on the preview | Reward is published but the rewards section of the detailed description is not | Publish the rewards section in the detailed description |
| Cannot change the funding goal | It locks permanently at launch | Nothing after the fact. Set a clearable goal and use stretch goals above it |
| Cannot change the project URL | It locks when you publish the preview | Nothing after the fact. Decide the URL before publishing |
| Raise dropped after the campaign ended | Failed payments during the 15-day collection period | Expected. Leave unpaid orders open so backers can pay in late pledge or the pledge manager |
| EU backers charged no VAT | Indiegogo paused EU VAT support on 4 August 2026 | Set EU rates yourself in Shipping and Taxes, or price VAT into the reward |
| Payout has not arrived | Adyen pays out weekly on Fridays, after a 3 to 5 day settlement | Expect a fortnight or more from campaign close, in several instalments |
16) How to contact Indiegogo support
The knowledge base at help.indiegogo.com is the current documentation and is where the platform's own answers live. The older Zendesk help centre at support.indiegogo.com has been largely unpublished since the migration, though many of its pages still appear in search results and now return errors, which is worth knowing when a Google result takes you nowhere.
For direct contact, Indiegogo provides a contact form on their site and an email support address. Response times vary, and for anything touching onboarding or a rejected review you will get a faster resolution by including the specific error message and the document you uploaded rather than a general description of the problem.
How BoostYourCampaign fits
We have run campaigns on Indiegogo since 2010, through the Gamefound migration and out the other side, alongside Kickstarter campaigns in the same period. This page exists because creators kept asking us the same questions after the platform changed and the answers were not written down anywhere current.
If you would rather not learn the onboarding requirements by having documents rejected, or work out shipping zone configuration the week before launch, that is the work we do. We handle the pre-launch audience, the campaign page and video, ads, PR, the pledge manager setup and fulfillment from our own warehouses in the US and EU.
- 4,600+ Kickstarter and Indiegogo campaigns since 2010
- $734M+ raised, 4.9 out of 5 across 300+ verified reviews
- In-house video studios and our own fulfillment warehouses in the US and EU
- Fixed fees published up front, with a free re-launch if a campaign misses its goal
Frequently Asked Questions
Does Indiegogo still have Flexible Funding?
No. Flexible Funding was discontinued for new campaigns on 16 October 2025 as part of the platform upgrade. Every new Indiegogo campaign is Fixed Funding, all-or-nothing: if you do not reach your goal, backers are not charged and you receive nothing, including no fees. Campaigns that were live on Flexible Funding at migration were converted automatically, with goals adjusted to reflect funds already raised.
How long does Indiegogo take to review a campaign?
Up to three business days. Separately, your launch date must be set at least seven days from the moment you submit for review, so the practical minimum from submission to going live is about ten days. You can keep editing the project while it is under review, and if it is rejected you are told what to fix before resubmitting.
What are Indiegogo's fees in 2026?
A platform fee of 5% of funds collected, plus payment processing charged per transaction in the project currency. Indiegogo's own example has a $10,000 raise across 100 transactions paying $500 platform and $320 processing, leaving $9,180. Nothing is charged if the campaign does not reach its goal. The pledge manager carries no separate fee beyond 5% plus 3% and $0.20 per transaction.
When do I get paid after an Indiegogo campaign?
Funds reach your Adyen account three to five business days after collection, and Adyen pays out to your bank weekly on Friday nights CET. Payments continue processing for up to two weeks after the campaign ends, so you receive several payouts rather than one. Plan for the first money to be usable roughly a fortnight after your campaign closes.
Can I change my Indiegogo funding goal after launching?
No. The funding goal locks permanently when the campaign launches. This is the strongest argument for setting a goal you are confident of clearing and putting your ambition into stretch goals above it, which can be added and unlocked during the campaign.
How do I create a referral link on Indiegogo?
Click the tool button in the top right, choose your project, go to Project, then Referral links, then Add a referral link. Give it an internal display name so you can filter later. Attribution is last click, tracked to a logged-in user across devices or to a cookie for up to 28 days in the same browser. Create a link for every channel before you launch, because pledges that arrive before the link exists cannot be attributed retrospectively.
What is Stretch Pay on Indiegogo?
Stretch Pay lets backers split a pledge into between two and ten instalments. The creator sets the number of instalments and the minimum pledge value that unlocks the option, including tax and shipping. Enable it in Project, then Settings, then Stretch Pay. It can be turned on during the campaign and during late pledge and the pledge manager. Disabling it later does not affect pledges already on a plan.
Does Indiegogo handle EU VAT?
Not since 4 August 2026. Indiegogo paused automatic EU VAT support for both new campaigns and campaigns where it had previously been enabled. EU tax rates remain editable in campaign settings and are preconfigured per country, but applying and accounting for EU VAT is now the creator's responsibility. UK VAT support is unchanged.
What is the difference between late pledge and the pledge manager?
Late pledge collects pledges after funding without defining shipping costs or collecting addresses, and cannot launch until fifteen days after crowdfunding ends. The pledge manager is the final stage, where backers confirm products, give shipping details and pay outstanding amounts. Late pledge is optional and you can go straight to the pledge manager if you prefer.
Can I use Indiegogo's pledge manager for a Kickstarter campaign?
Yes. That is an External Campaign. You import the project, and once Indiegogo has reviewed and accepted it you launch the pledge manager or late pledge yourself. For a Kickstarter creator this is worth pricing against standalone pledge manager tools, since the post-migration system is considerably more capable than what Indiegogo offered before.
What happens to unpaid pledges after an Indiegogo campaign ends?
A payment collection period of up to fifteen days runs after the campaign, during which failed payments are retried up to three times and backers can change payment method. For campaigns starting after 16 December 2025, unpaid orders are not cancelled by default and backers can complete them during late pledge or in the pledge manager. You control this in project settings.
Can I test my Indiegogo campaign before launching?
Yes, and you should. Assign a tester role in Project Settings, then Testing. In tester mode you can place orders at any project stage, preview any phase, view the page as a chosen user group and see unpublished content. No payment data is needed because test orders never reach the payment provider. Find them afterwards under Orders with the "Is test order" filter.
Why are my rewards not showing on my Indiegogo page?
There are four separate publish gates and all must be open. Every set item inside the reward has to be published first, or the reward cannot be published at all. Then the reward set itself is published from the three-dot icon in the Rewards list. Then the Is published toggle in the reward's General info. Then, during the preview stage, the rewards section of the Detailed description has to be published, and it is unpublished by default. Also check that Product is buyable is set to yes.
How do I activate a reward on Indiegogo after creating it?
Creating a reward does not publish it. Go to Products, then Rewards, publish every set item inside the reward, then click the three-dot icon next to the reward and choose Publish. On a draft project also publish the rewards section under Project settings, then Project details, then Detailed description, or nothing appears however you set the reward itself.
Can I change the order rewards appear in on Indiegogo?
No. Rewards are sorted by price from lowest to highest and that order cannot be changed. The only exception is the pinned reward, which appears in a floating box at the top of the product page, and you can pin one at a time. Set items inside a reward can be reordered by dragging.
If you want help running an Indiegogo campaign rather than administering one, book a free strategy call and we will tell you honestly whether the platform is the right fit for your product.
Want results like these for your campaign?
We've helped 4,600+ creators raise over $734M. Let's pressure-test your launch plan and find the highest-leverage fixes before you go live.
Book a free strategy call →Get the free 87-step launch checklist
The exact pre-launch, live-campaign and fulfillment steps we use across 4,600+ launches. Free PDF, emailed instantly.
You're in - check your inbox. Open the checklist now ->


